티스토리 뷰
** 이 튜토리얼에서는 콘텐트 내용 크기에 맞게 셀 크기가 변하는 테이블 뷰 셀을 만들 예정이다 **
오토레이아웃을 사용해서 만들 수 있다.
하는 방법 :
1. UI 요소들을 오토레이아웃으로 연결한다
2. 테이블뷰의 rowHeight을 UITableViewAutomaticDimension으로 설정한다
3. estimatedRowHeight을 설정하거나, height estimation delegate method를 구현한다
[예제]
1) AuteurTableViewCell이라는 파일을 만들고, XIB도 만들자.
2) Cell파일에 자동으로 만들어진 함수들 지우고,
@IBOutlet weak var bioLabel: UILabel! 이거 추가해주기
3) Main.storyboard에서 cell 클래스 방금 만든거로 설정하기
4) 스토리보드에 셀에 라벨 추가해주고, line을 0으로 해준다 (매우중요)
5) 스토리보드 라벨이랑 코드랑 연결해줌
6) ** 모든 사이드에 콘스트레인트가 있게 해야함!! ** 위아래는 0 0, 좌우는 8 8 로 연결해주기
7) run하면

이렇게 되는걸 볼 수 있다 ;;
8) 코드를 쓰기 시작한다
테이블뷰가 우리의 커스템 셀을 쓰도록 개조해야된다.
AuteurListViewController.swift에 tableView(_:cellForRowAt:)을 밑의 코드로 바꾼다
func tableView( _ tableView: UITableView, cellForRowAt indexPath: IndexPath ) -> UITableViewCell {
let cell = tableView.dequeueReusableCell( withIdentifier: "Cell", for: indexPath) as! AuteurTableViewCell
let auteur = auteurs[indexPath.row]
cell.bioLabel.text = auteur.bio
cell.bioLabel.textColor = UIColor(red:0.75, green:0.75, blue:0.75, alpha:1.0)
return cell
}
셀에 정보를 담고, 색깔 바꾸고, return 해준다
9) AuteurListViewController에서 viewDidLoad()밑에 얘네 두 줄을 추가해준다.
tableView.rowHeight = UITableView.automaticDimension
tableView.estimatedRowHeight = 600
rowHeight을 automaticDimenstion으로 설정하면, table view는 '오토레이아웃이 cell의 height을 결정하게' 한다!!!!!
이걸 하려면, estimatedRowHeight을 제공해줘야 한다.
10) Main.storyboard에서 cell의 background color를 #161616으로 해준다
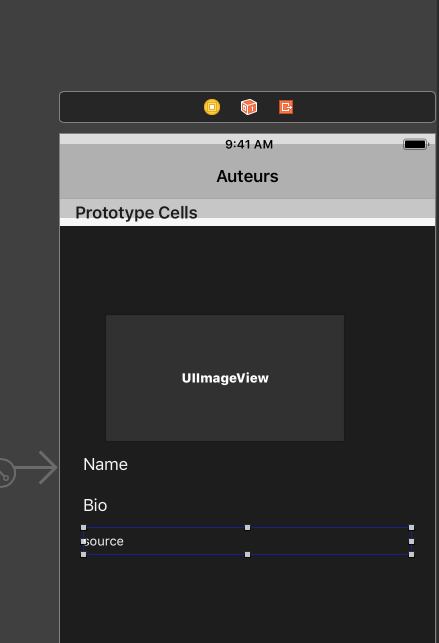
11) 이미지 추가하기: AuteurTableViewCell.swift에
@IBOutlet weak var nameLabel: UILabel!
@IBOutlet weak var source: UILabel!
@IBOutlet weak var auteurImageView: UIImageView!
이 세개의 값을 추가해준다.
12) 기존에 bio label에 추가해줬던 constraint들 지워주고, bio label 텍스트 색깔을 흰색으로 바꿔준다.
13)

이렇게 만들어주고 outlet들도 연결해준다.
오토레이아웃도 설정해줌.
14) hugging priority 올리면 intrinsic size에서 커지는거 싫어함. 최대한 자기 사이즈를 지키려고 함.
15) AuteurListViewController에 이 세줄을 추가해준다
cell.auteurImageView.image = UIImage(named: auteur.image)
cell.nameLabel.text = auteur.name
cell.source.text = auteur.source
textColor바꾼 후에 이거 추가해준다
cell.nameLabel.textColor = .white
cell.bioLabel.textColor = UIColor(red:0.75, green:0.75, blue:0.75, alpha:1.0)
cell.source.textColor = UIColor(red:0.74, green:0.74, blue:0.74, alpha:1.0)
cell.source.font = UIFont.italicSystemFont(ofSize: cell.source.font.pointSize)
cell.nameLabel.textAlignment = .center
cell.selectionStyle = .none
16) 이미지 둥글게 만들어준다
cell.auteurImageView.layer.cornerRadius = cell.auteurImageView.frame.size.width / 2
Clip to Bounds 체크해준다
17) warning 없애려면
name label의 trailing 속성을 >= 8로 바꾼다
18) FilmTableViewCell이라는 UITableViewCell 상속받은 클래스를 하나 만들어준다
19)
@IBOutlet weak var filmImageView: UIImageView!
@IBOutlet weak var filmTitleLabel: UILabel!
@IBOutlet weak var moreInfoTextView: UITextView!
이 세개의 값을 추가해준다.
20) 스토리보드에서 테이블뷰 셀 클래스를 FilmTableViewCell로 설정해준다
21) 이미지뷰, 라벨, 텍스트뷰 테이블뷰 셀 안에 넣어준다
22) textView의 내용을 'Taps for Details> '로 하고, label은 Name으로, image view는 aspect fit으로 한다
textView의 alignment를 centered로 하고, textColor은 red, scroll은 disable한다.
스크롤을 disable 하는것은 꽤 중요하다!!!! line 0으로 만드는것처럼
또 User Interaction도 disable 해야함!!
=> 이걸 하면 텍스트뷰 자체가 선택되는게 아니라, 셀 선택도 되게 해줌!!!
background color도 clear color로 해 주기.
23) 오토레이아웃 설정 해줌.
24) AuteurDetailViewController.swift에 이 extension을 추가해줌
extension AuteurDetailViewController: UITableViewDelegate {
func tableView(_ tableView: UITableView, didSelectRowAt indexPath: IndexPath)
{ // 1
guard let cell = tableView.cellForRow(at: indexPath) as? FilmTableViewCell
else { return }
var film = selectedAuteur.films[indexPath.row]
// 2
film.isExpanded = !film.isExpanded
selectedAuteur.films[indexPath.row] = film
// 3
cell.moreInfoTextView.text = film.isExpanded ? film.plot : moreInfoText
cell.moreInfoTextView.textAlignment = film.isExpanded ? .left : .center
cell.moreInfoTextView.textColor = film.isExpanded ? UIColor(red:0.75, green:0.75, blue:0.75, alpha:1.0) : .red
// 4
tableView.beginUpdates() tableView.endUpdates()
// 5
tableView.scrollToRow(at: indexPath, at: .top, animated: true)
}
}
내가 원하던 제일 중요한 부분이다!!
25)
cellForRowAt에 이 코드블럭을 추가해준다.
cell.moreInfoTextView.text = film.isExpanded ? film.plot : moreInfoText
cell.moreInfoTextView.textAlignment = film.isExpanded ? .left : .center
cell.moreInfoTextView.textColor = film.isExpanded ? UIColor(red:0.75, green:0.75, blue:0.75, alpha:1.0) : .red
26) image view의 content hugging priority와 content compression resistance priority를 바꿔준다
horizontal: 251
vertical: 252
horizontal: 750
vertical: 1000
26) dynamic type 구현하기
Larger Text Accessibility feature을 지원하려면 어떻게 해야 할까??
라벨 세개 다 Font> system style을 headline으로 해준다.
'macOS, iOS' 카테고리의 다른 글
| [iOS] 웹뷰를 여는 4가지 방법 (0) | 2019.09.09 |
|---|---|
| [iOS] int to string (0) | 2019.09.09 |
| [iOS] table view dynamic cell height 적용하기 (0) | 2019.09.03 |
| [iOS] DispatchQueue.main.async { (0) | 2019.09.02 |
| [iOS] 앱이 비활성화 되는 경우 (홈버튼 눌렀을 때/ 전화/SMS시 ) 실행되는 코드 (0) | 2019.08.29 |
